Take a photograph with three elements displaying foreground/mid/background. Aperture at the lowest possible.
All photos were taken on a tripod . Now after rushing home with the 50 ml lens I forgot to set my camera to AV .
 |
| f/1.8 1/2000 ISO 100 These photos are taken with the 50ml lens but I forgot to change my settings to AV I left the settings on M In this shot I focused on the foreground object, in focus the table around it is in focus whilst behind the mid/background objects are out of focus. |
 |
| f/1.8 1/2000 ISO 100 I am focusing on the mid ground object nice and clear, the foreground object along with the background are not in focus. Again the table is in focus around the mid ground object. |
 |
| f/1.8 1/200 ISO 100 In this shot I focused on the back cup which was in focus, no blur but behind was blurred along with the foreground/ mid ground . The table also stayed in focus around the background object. |
This is the second task of exercise 2....Take the same photos but with a f/22 focusing on each element.
Well I didn't find any changes why not ? Because I was using a f/22 being a greater DOF everything stayed in focus .
But again using the 50 ml lens but I didnt put it on AV the setting was still on M.
 |
| f/22 1/6 ISO 100 everything is in focus from the foreground right to the tress in the background. |
 |
| F/22 1/6 ISO 100 All in focus |
 |
| F/22 1/8 ISO 100 Again the whole scene in focus. All photos taken with a tripod. EXERCISE 1 Take an environmental portrait with everything in the frame in focus. This photo wasn't taken on the 50 ml lens from class I used my own lens but I have left these on just to show my understanding of this exercise. |
 |
| f/11 1/400 ISO 800 I have a focused shot but had I used a f/22 or f/32 it perhaps could of been in much more detail. Also after Carolyn explained to me this picture is not a environmental one I should move this to the landscape shots but if I do that I seem to loose the picture altogether so I have left it here. EXERSICE 3 Take an environmental portrait with everything in the frame in focus |
 |
| f/22 1/8 ISO 100 Now this shot finally was taken by the right lens and the right setting of AV The whole shot is in focus , I used a tripod because of the slow shutter speed. This is an environmental shot of Victorias room My ISO is too low theres not enough light so I will do this shot again with a higher ISO. f/3.5 1/2 ISO 100 The rest of my exercises on this environmental shot are at the bottom of the page as I couldn't get my photos in the right place. EXERCISE 4 Take a portrait with a narrow DOF then take the same again with a wide DOF. |

Now these photos were taken with the right 50 ml lens from class BUT I forgot to set the camera to AV and shot in manual.
 |
| f/22 1/15 ISO 100 This is a wide DOF Victoria is in focus and so is the background |
 |
| f/2 1/640 ISO 100 This shot, Victoria is in focus but the background is slightly blurred, this is a NDOF EXERCISE 5 Take a photo of an object with a narrow DOF take the same shot again with a wide DOF These photos below are taken with the right lens at the right setting finally. This is the wide DOF photo |
 |
| f/22 4.0 ISO 100 Photos taken with a tripod In this shot the flower is not in focus maybe I was to close because a wide DOF everything is in focus not 100 % sure. The back ground is totally in focus. This shot is the narrow DOF |
 |
| f/1.8 1/50 ISO 100 This shot has come out how I expected subject in focus back ground isnt. Also taken on a tripod with the 50ml lens on the AV setting. EXERCISE 6 |
Then stay in the same place and take 10 steps away and take the same photo again.
Again I have the right lens but I hadn't set my camera to AV it was in M. Also so sorry when I took the portrait with my subject standing close I only shot the shoulders up but then in ten 10 steps back I took a whole portrait.
 |
| f/1.8 1/640 ISO 100 In this shot I have good focus and detail with the blurred background . I was using a tripod but remember I used the 50 ml camera lens but I wasnt on the setting AV. |
 |
| f/1.8 1/1000 ISO 100 This was taken using a tripod because of the fast shutter speed , taking the 10 steps back , the whole photo is in focus but the detail of Victoria isn't very sharp . Perhaps she moved slightly ? SELF DIRECTED ISO TEST Choosing an aperture of f/5.6 photograph the same scene each time changing the ISO starting at the lowest ISO going up to the highest ISO. Really enjoyed this exercise noticed the changes from the exposure , under exposed to over exposed. The changes are amazing, they are really noticeable. In the colours and the shadows . |
 |
| F/5.6 1/6 ISO 100 These shots were taken about 1.30 in the afternoon. Shutter speed should of been 60/80 . Nothing is moving so the speed was too low. |
 |
| F/5.6 1/6 ISO 200 |
 |
| F/5.6 1/6 ISO 400 |
 |
| F/5.6 1/6 ISO 800 |
 |
| F/5.6 1/6 ISO 1600 Really over exposed shot to much light. These shots were taken at approximately 5 pm. Really noticing the different light for the different times of day as well , how it effects your shots. |
 |
| f/5.6 1.0 ISO 100 shutter speed really should be 60 to 80 aperture is ok. |
 |
| f/5.6 1.0 ISO 200 I like this shot the ISO seems to be better . |
 |
| f/5.6 1/5 ISO 400 This shot is under exposed Loosing detail to the darkness. |
 |
| f/5.6 1/6 ISO 800 |
 |
| F/5.6 1/6 ISO 1600 I like this shot for this group. |
 |
| F/5.6 13.0 ISO 100 This shot is very dim / under exposed. |
 |
| f/5.6 13.0 ISO 200 This shot is under exposed. Incorrect shutter speed , I was adjusting the speed when looking through the lens |
 |
| f/5.6 13.0 ISO 400 This shot is is getting closer to the right light amount |
 |
| f/5.6 13.0 ISO 800 This shot is quite yellow |
 |
| f/5.6 13.0 shutter speed ISO 1600 This shot is over exposed , not a setting I would choose . |
 |
| f/1.8 1/80 ISO 800 |
 |
| f/3.5 1/2 ISO 100 This image seems to be in focus sadly it portrays a mess. I have a fstop which I feel should have been higher so I could of got the whole image in focus . I see areas which are not in focus. My shutter speed could have been higher as well. |
 |
| f/1.8 1.25 ISO 800 I have a high ISO because Im indoors in a room taking this shot. I have a narrow DOF and I think I should of had a 1/60 shutter speed . Still trying to understand aperture and getting it right. The picture is not totally in focus I used a tripod but it still had blur, my camera s lens was alittle off. Having problems with it. |
 |
| f/16 1/125 ISO 500 This is our environment . It doesn't always look like this but I think it fits the exercise well. ISO 500 as we were inside shooting with the flash up. Speed good just incase one of the kids bolted, and a wide depth of field to get everything in focus. |
My 2 Practitioners for week 2 are..... Sebastiao Salgado and Ansel Adams
Subject..Aperture : Depth of Field : DOF
Sebastiao Salgado what a brilliant photographer, his work is amazing I loved his passion and love of photography .

Sebastiao was born on February 8th 1944 in Aimores , Brazil. This man has travelled over 100 countries for his photographic projects. He is a UNICEF Good will Ambassador, an honorary Membership of the American Academy of Arts and Sciences in 19192 and was awarded The Royal Photographic Society's Centenary Medal and Honorary Fellowship in 1993.
He is particularly noted for his social documentary photography of workers in less developed nations.
 |
| This is Sebastiao at the World Social Forum in 2003 |
 |
| A beautiful example of a wide DOF we have our subjects in focus and also the mountains are visible not blurred tho. Im not to sure as our family in front are in focus and show great detail and the background doesnt . My guess would be Sebastiao would have used an f/stop of 22 ? This shot would be a low vantage point as he appears to be looking up with his camera taking the shot. We have great background then the woman by herself would be the mid ground and then the family being our foreground. |
 This image is of a dispute between Serra Pelada goldmine workers and military police Brazil 1986 |
| This is another example of wide DOF we have the whole picture in focus, alot going on in this image covering a wide space..Perhaps this is an f/stop of 16..f/16. This is a low vantage point as Sebastian is below the subjects looking up taking his shot. |
 |
| This photo I would say would be a wide DOF as we have such a huge area in focus what an amazing example. My guess the Fstop would be f/22 upwards probably take on a tripod ? The vantage point here for him I would suggest was on the opposite hill looking down. This is a |
 |
| Children's ward in the Korem refugee camp Ethiopia, 1984. What strong images Sebastiao has , this is a narrow DOF I would suggest f/5.6 or perhaps a little higher f/10 . We have perfect images in front and an outline of another person in the background, not totally blurred tho. Vantage point would be straight on we have a man in the background I think a pillar in the mid ground and the mum and child the foreground. We have a close crop. |
 |
| Refugee from Gondan Mali, 1985 |
A very inspiring exercise. Totally helped me learn more about the DOF. This is a portrait shot so I would say Sebastiao was sitting in front.
...................................................................................................................................................................
My next practitioner is..

Presenting Ansel Adams with the Presidential Medal of Freedom...
ANSEL ADAMS
( Feb 20, 1902 - April 22, 1984)
He was born in San Fransisco, California in an upper-class family. When he was 4 he broke his nose due to the 1906 earthquake, he never had it repaired so it stayed crooked all his life.
Ansel was an American photographer, known for his black and white photographs of the California's Yosemite Valley.
He was an author of many books about photography and in 1952 he was one of the founders of the magazine Aperture.
The images I found of Ansels were exceptionally beautiful quite different to Sebastiao.
But great wide DOF examples..
 |
| These are just amazing shots my guess an f/22 plus. We cover a huge area in focus the sky is amazing an example of a wide DOF. The vantage point I would say would be low as he appears to be focusing on the background and the sky looking up. Obviously he is high up too and in line with the top of the 2 pines but I feel the sky is hi feature before the mountains in the back ground. |
 |
| These are the best shots Im blown away by how they took these images way back in the 1930s and there results produced were amazing pictures. Another wide DOF Im only guessing a f/stop of 32 plus. We have a totally focused picture the background is in focus the detail is awesome. His Vantage point here is a high one I think as he is focusing on the homes but appears to be slightly higher perhaps he's on a hill taking these images. The sky is a huge part of this photo but I feel the homes were his point of interest. |
 |
| A wide DOF again covering miles which are all in focus. Stunning.. |
 |
| These are Ansel's narrow DOF examples foreground in focus mid ground is too. F/stop maybe similar to the other 5.6 - 8 Hight vantage point , a lovely prominent fore ground with a darker foliage mid ground. |
 |
| Leaf, Glacier Bay National Monument. A example of a narrow DOF everything in focus in the foreground , my guess the f/stop would be f/8 ? A high vantage point as we are looking down at the subject. |
 |
| Dogwood Blossoms Everything is in focus , foreground and mid my guess another fstop of 8 up ? A narrow DOF high, vantage point . |
...............................................................................
| |
How do you identify them? Now, if you have a camera with aperture and shutter speed controls (a mode dial with PASM or P/Tv/Av/M) and you take it outside and half-press the shutter, two numbers should pop up: One might have an f in front of it (ie. f3.5) or it will be a decimal of sorts (ie. 4.0). That number is the aperture. The other number (if you're outside) should be larger, say around 200-4,000. That's the shutter speed. Aperture The aperture is the size of the lens opening. It controls the amount of light let in: a larger aperture lets in more light, while a smaller aperture lets in less light. 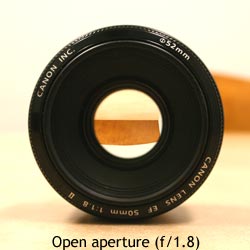 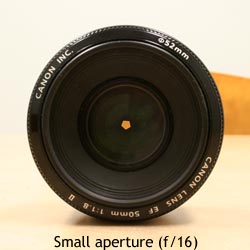 An aperture is made out of aperture blades (usually five to nine) that form a rough circle to control the size of the opening, and therefore the amount of light let in. The size of the opening is that f/number that I described earlier. Basically, that f/number is a ratio of focal length to aperture diameter. Do you need to know this? Not really, except you should keep in mind that the aperture is a ratio. Simply put, the smaller the f/number, the larger the opening (f/3.5 = 1/3.5 = 0.286; f/16 = 1/16 = 0.0625). That's all I'm going to explain here because it's an extremely complicated topic and you don't really need to know it. There's plenty of places on the web that explain it in great scientific detail; this is not one of them. The following is a diagram of f-stops. Each f-stop (or just a stop) lets in half the amount of light of the previous f-stop. 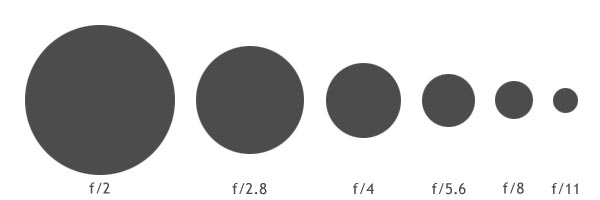 Now, lets get on to why this matters and how it can change what your picture looks like. Basically, a larger aperture (lower f/number) will have your subject in focus, and everything in front of and behind it blurry. A smaller aperture will have your subject in focus and everything in front of and behind it quite focused as well. Take a look at the following diagram; the further apart the lines are, the more out of focus something is: 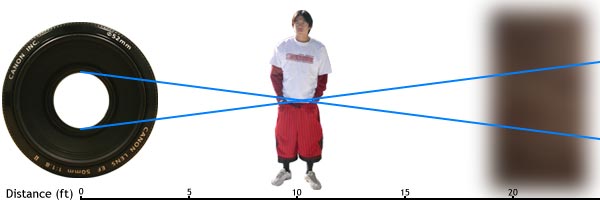 Large aperture (f/1.8). 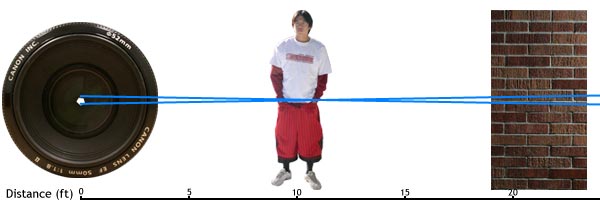 Small aperture (f/16). 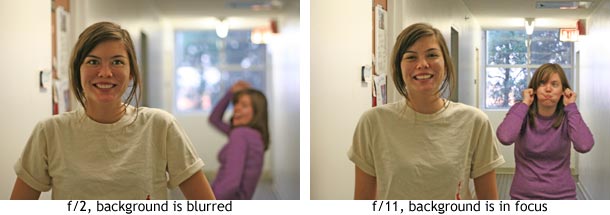 Summary: Large aperture, background out of focus; small aperture, everything in focus. (Large aperture = smaller f-number, small aperture = larger f-number). Shutter Speed Shutter speed is a much simpler concept to understand. It's basically how long the sensor/film in the camera is exposed to light. How long the shutter stays open depends on how much light there is. For pictures with the same aperture setting, if the is shutter open too long, the picture will be too bright, and if it's not open long enough, the scene will be too dark. Therefore, you control the overall exposure (lightness and darkness) of the scene with both the aperture and shutter speed control. 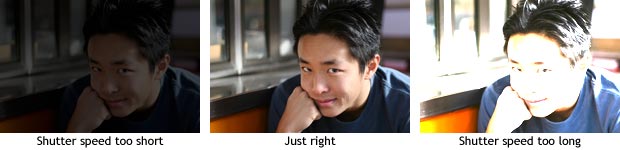 Your camera judges this for you, but you can manually set it as well. The shutter speed is the other (usually larger) number that isn't the aperture value. This number is actually a fraction, so if you see a shutter speed of 4000, it's actually 1/4000th of a second, while a value of 200 is 1/200th of a second. Now, remember how I mentioned stops in the aperture section? Well, they also apply to shutter speed, but in a slightly different way. By halving the time of exposure, you're letting in half the amount of light (so if you go from 1/2000 sec to 1/4000 sec, then you're letting in half the light). The opposite is true for doubling the exposure time. What you can do with shutter speed is freeze motion with a fast shutter speed or capture movement with a slow shutter speed. Flowing water looks silky smooth at speeds slower than 1/8th of a second (with a tripod), while you can freeze water in time with fast shutter speeds. The same thing goes for hip hop dancers. 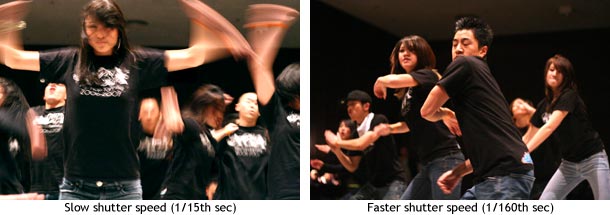 Also, an important side note is that there is a rule for getting sharp images: 1/focal length. So if you have a 50mm lens then you'd need at least 1/50th of a second for your picture to not be blurry, and if you're using a digital SLR then there is a crop value (minus a few exceptions) of 1.5/1.6 so your 50mm lens is a 75~80mm lens, which means that you need a shutter speed of at least 1/80th of a second to get a sharp image. Summary: Fast shutter speed = freeze action. Slow shutter speed (w/ tripod) = silky flowing water. How Aperture and Shutter Speed are Related Aperture and shutter speed are bound together like an old married couple. For the same scene, if you open the aperture, you increase the shutter speed, and if you close down the aperture, you decrease the shutter speed. Think of a bucket of water with a hole in the bottom. If you have a large hole in the bottom of the bucket (large aperture), water will drain out quickly (fast shutter speed). Conversely, for the same amount of water, if you have a small hole in the bottom of the bucket (small aperture), the water will drain out slowly (slow shutter speed).  Remember how I mentioned stops earlier? Well one aperture stop is equivalent to one shutter speed stop, therefore if you open up your aperture one stop brighter (say from f/8 to f/5.6), and increased your shutter speed to one stop darker (like 1/250 to 1/500), then you would get the same exposure. So f/8 @ 1/250 is equivalent to f/5.6 at 1/500. This is the theory of equivalent exposures. Summary: Larger aperture, faster shutter speed; smaller aperture, slower shutter speed. Increase aperture by one stop and decrease shutter speed by one stop = equivalent exposure (and vice versa). There are a lot of uses for aperture and shutter speed. One of which is of course the background blur that everyone always wants to know how to get. Another thing you can do with a slow shutter speed is a night shot, which can give very interesting results. Check them out. | |
No comments:
Post a Comment